How To Install Floating Shelves
When mounting any type of wall shelf or floating shelf system, proper installation is crucial. Strong floating shelves start with a proper shelf bracket mounted into a wall stud, or wall anchors to have as much biting material as possible. Always refer to the installation guide for your specific shelving system as a guideline, but keep in mind that each application is unique and should be handled with care.
The specific tools needed for your specific wall mounted floating shelves may vary, but generally, you’ll need a:
- Tape Measure
- Level
- Stud Finder
- Screwdriver
- Drill
All Federal Brace wall shelves come complete with necessary brackets, hardware, and silicone for finishing.
Low Profile Floating Shelf Installation
- Determine the height of the shelf bracket by measuring from the floor with a tape measure and make a horizontal mark. Using a stud finder, locate the center of the wall stud and make a vertical mark.
- Locate the center of the second wall stud and make a vertical mark. Place a level on the first horizontal mark and draw a level line from the first vertical stud mark to the second vertical stud mark.
- Next, you will need to drill pilot holes using a 5/32 or smaller drill bit.
- Once the pilot holes are drilled, hold the outer bracket in place and use the two included 1/4-20 x 2.50” bolts to fasten the bracket to the studs. Tighten down the fasteners entirely and then remove the NOMARR Surface Protection by pulling the tabs
- Line up the interior bracket rib holes to the holes on the outer bracket and insert the included screws. Place included nuts on the screws and hand-tighten. Use a socket set and a screwdriver to tighten the nuts entirely.
- Slide the Low Profile Shelf over the bracket, and you’re done!
Pro Tip: You can run a bead of adhesive silicone on the top of the bracket before adding the shelf to hold it in place permanently.
Corner Floating Shelf Installation
- Use a measuring tape, starting from the floor, to mark your desired shelf height. Mark both sides of the wall.
- Use a level to draw a horizontal line, making sure each side is at the same height.
- Line the bracket up with the horizontal lines, and mark guides at the hole placement, one side at at time.
- Drill pilot holes at the guide marks. *Note: Do not drill a pilot hole or use a drywall anchor where a stud is intersecting a mounting hole.
- Use a #2 Phillips head screwdriver to screw the included drywall anchors into the pilot holes.
- Line the bracket holes up with the wall anchors, and use the included #6 screws to fasten the bracket to the wall.
- Optional: Add a bead of silicone adhesive to the top edge of the bracket for added stability.
- Slide the corner shelf over the bracket, and press down on the back edges to seal the silicone adhesive to the shelf.
- Optional: Apply silicone adhesive to all edges of the shelf that meet the wall for a secure and seamless installation.
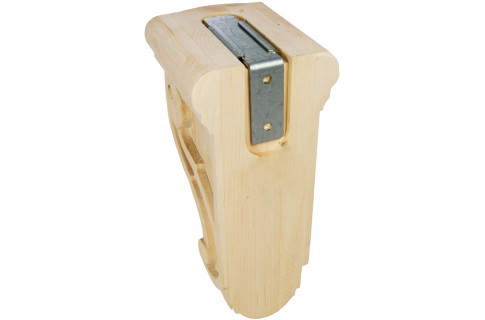
Classic Floating Shelf Installation
Whenever installing the floating shelf bracket make sure you are tying into a minimum of 1.75” thick stud wall material. You will want the fasteners to have as much biting material as possible. This will provide a secure fastening of the bracket. Remember a weak support bracket makes for a weak floating shelf. One placement is decided, follow these installation steps:
- Hold the bracket in place and mark your slots. Drill pilot holes, using a drill bit slightly smaller than the fasteners (0.25”). Once the pilot holes are drilled, put the bracket in place and install fasteners.
If you’ve purchased the stainless steel shelf system, you will need to add the included spacers before fastening the bracket to the wall. Put the fasteners through the bracket holes then put the spacers on the fasteners. The spacers should sit between the bracket and wall with the half-hole facing up and the long side facing the middle of the bracket. The spacers will allow the rear Locking Lip of the stainless steel shelf to sit between the wall and the bracket, the Locking Slot. - Prior to tightening fasteners completely, check level across the arms of the bracket. Adjust as needed and make final tightening of fasteners.
- When the bracket has been fastened tightly, drill a hole through the substrate where the cord hole in the mounting bracket is.
- With the bracket securely fastened, add a bead of silicone around the top edge of the arms and back of the bracket.
- Insert shelf over the arms of the bracket and move the shelf into its final position. Once the shelf is in place you will want to wipe it down to get rid of any handprints or other debris.
- Final step is to place your decor, enjoy your work and your new floating shelf!
Shop Floating Shelves
|
Classic Floating Shelf System |
Low Profile Floating Shelf System |


|
LED Floating Shelf |